
Do you ever have moments when your coworker, designer, marketing consultant or coworker doesn’t understand what you want or are trying to say? Marketing communication is more than words, visuals can help get your point across and expedite getting what you want! At WMT, we spend a lot of time creating how-to documents with pictures for clients to empower them to drive their marketing successfully. Internally, we also share images in text messages or emails to get right to what we need to show or have fixed.
One of the simplest marketing stress reducers to speed up how people understand you is to use screenshots!
Learning how to do screenshots can be a valuable time saver. They allow you to easily capture what is displayed on your screen and share them with others or save them for later, using your computer to take a picture of your screen.
We will explain how to create a screenshot for both PC and Mac users so you can be a pro in minutes!
Screenshots for PC Users
There are three ways to create screenshots using Windows.
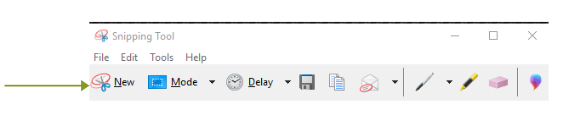
Snipping Tool-The Snipping tool is installed on all Windows computers by default.
- On your Windows main screen, navigate to the bottom left corner and hit the Start button. Once you do, a Search box will appear and you can simply type “snipping tool“. (Small hint: if you then right click the icon for the tool, you can select Pin to the Task bar and then it will appear on the bottom of your screen for future use.)
- Select the Snipping tool icon to open it.
- Click the “new” button; this will result in the screen becoming brighter and turn your arrow into a plus sign shape.
- Finally, you simply click and drag across the area of the screen you would like to copy.
- Once this is complete you have the option to edit the image, copy it, or save it.
Windows Keyboard Shortcut – capturing only a portion of screen
- Hit the Windows, Shift and S keys all at the same time.
- After hitting the keys, the screen goes dark with the same drag and drop features of Snipping Tool, mentioned above.
- You can edit, copy and/or simply save the image.
Windows Keyboard Shortcut – capturing the whole screen
- Push the Windows and Print keys simultaneously. The print key is the one that says PrtSc and is found in a different spot depending on your keyboard.
- Once the screenshot is taken, it automatically saves and it can be found by searching “screenshot” on your start menu.
- From here you can share, edit, copy, or print your screenshot.
Screenshots for Mac Users
For those that own a Mac computer there are two ways to take screenshot.
Screenshot Part of Your Screen
- Start by pushing Command, Shift and 4 keys all at the same time.
- Then drag the cursor until the section you would like to copy is included in the grey box that is created.
- The image will save as a png image and can be edited. By default images are saved to your desktop.
Screenshot the Whole Screen
- This is done by hitting Command, Shift and 3 keys all at the same time.
- Once again, by default, the image will save to your desktop.
-
The next time you want to share exactly what you see (and need someone else to see) in emails or documents you now know how!
Here’s to happy, healthy communicating!